STARCHED FABRIC WALLCOVERINGS
I learned this technique as an Army wife (in a former life), where I moved 23 times in 19 years. We couldn’t put holes in the walls, couldn’t make any "permanent" changes to the Government housing (or most civilian apartments/houses, either), so until a very generous lady taught us all her decorating trick - put fabric on almost anything using Sta-Flo liquid starch - all of our quarters looked the same. For example, the Gov’t. must have bought all the paint ever made that was the same color as the original Crest toothpaste, because we had that color in our houses for 10 years. We actually used Crest to fill the nail holes when we were moving - it passed inspection every time!
Anyway, thanks to Mary Starner, we finally had a chance to express ourselves in our decorating. I have applied starched fabric to walls, appliances, metal storage cabinets, switchplates & electrical outlet covers, the inside of bookcases (makes a striking backdrop for displaying collections), the backside of furniture pieces that were placed in the middle of the incredibly long, narrow rectangular shape of living-dining room combinations (turn a buffet sideways & make a room divider of it; cover the back with a fabric to compliment the living room section), ugly (oh, Lordy-hideous!) paneling in rent houses. I’ve starched bright red Christmas-print fabric to the front door for the holidays. I put a pig print on the front of the refrigerator once when I was dieting. You name it, and I have covered it with either fabric or Contact paper! (Did you ever need to know that you can put Contact paper over ugly tile in kitchens or bathrooms - even over ugly Formica counter-tops?)
The biggest advantage to this technique is that you can match your walls (or whatever) to the rest of your decorating scheme. Plus, if you move, you can strip the fabric off the walls, wash it, and take it with you, so you can do it again at the next house. (Clean the walls with a mop and warm water, & it looks like it did before you started.) I always buy some extra fabric to keep on hand for the next location, or for replacement if something should happen to the current wall-paint splatters, or whatever.
Currently, I have a Mickey Mouse bathroom, with the vanity wall covered with a primary-color-striped sheet from a set of MM sheets. (It has a round mirror framed in black, with Minnie ears from a headband glued to the top.) Last year I decorated rooms for two grandsons, one 13 and one newborn. The teenager’s room was done with a fabric that has a black background with various planets depicted on it. He’s a Trekkie (or was at the time), so the theme seemed to fit. He had a bunk bed/futon in the room, so I made a quilt for the top bunk (where he slept) of the same planetary fabric, and machine quilted around the planets. The bottom is the futon part, and it already had a red cover, which matched one of the planets in the wallcovering. Add one or more of the Hallmark Christmas ornament starships and some glow-in-the-dark stars on the ceiling, and you're in Ten Forward when the lights are off...
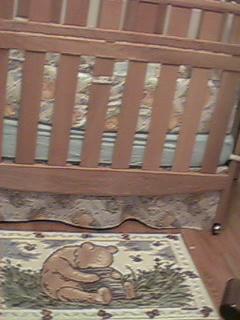
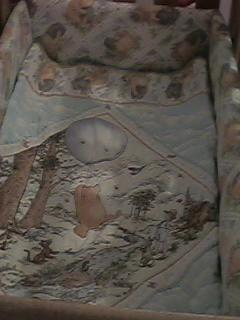
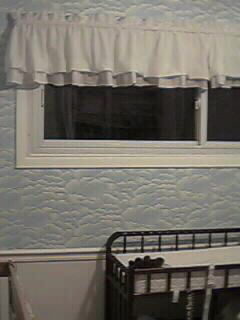
The nursery was a completely different story. My daughter chose a Winnie-the-Pooh theme. Well, of course there’s no fabric available, but there are Disney sheets and coordinating curtains & stuff. I bought a set of sheets, and a dust ruffle for a twin size bed. The width of the dust ruffle was the same as the crib, so with a couple of seams to shorten the length, I had a crib skirt finished. The bottom sheet of the set matched the dust ruffle, so I used it to cover the bumper pads. (HINT: I used Velcro to attach the bumper pads - easier to attach, and no worries about choking hazard, etc.) We starched a wonderful light blue and white cloud fabric on the upper portion of the wall, and then added a white chair rail at the bottom of the fabric. I made a quilt from appliqués cut from the Disney coordinating fabric curtains, and used the cloud fabric in the corners. The central appliqué is of Winnie-the-Pooh floating up into the sky holding onto a balloon (the blustery day?). I made a diaper stacker out of the top sheet, with the same balloon theme. My daughter added a white topper, and viola! - it’s the most peaceful room you’ve ever walked into. You can sit in the rocker, look up at the "sky", and feel like you’re on a balcony or in a tree-house.
My daughters were 10 and 12, I think, the year I learned this trick. The one whose nursery is described above recently told someone (in my presence) that I had decorated the perfect girls’ room for her and her sister. It was my first "starched" room; I’m delighted to know she really did like it as much as I did! For that room, I used sheets - a Dior design I found on sale at Dillard’s. They had a pale lavender and cream tiny houndstooth check background, with bouquets of petunias (purple, lavender, and white ones, with green leaves) scattered over them. The room was an attic room, with walls that slanted steeply upward to a narrow ceiling. I covered the walls with the sheets, and trimmed all the edges around the ceiling with lavender grosgrain ribbon. The windows in this room were small. I put eyelet cafe curtains on them, with that same ribbon run through the beading at the top and tied in a bow at the center. The twin beds had white eyelet dust ruffles. We were transferred before I could make matching quilts; I still have the pieces in a UFO cabinet...
I have covered walls and made matching curtains from sheets, then made a quilted spread from a coordinating sheet. When you cover the switchplate with matching fabric, it "disappears" into the wallcovering. (Just cut the appropriate holes for the screws & the switch, and starch it onto the plastic; let it dry before replacing it.)
Now for the technique (finally)...
Supplies include: clean sponges, a tub of water for rinsing the sponges, drop cloth for the floor so you don’t have to worry about drips (they won’t hurt anything, but it’s messy to clean up), and 100% cotton fabric (without nap!). A spray bottle for the starch is handy, but it should be stronger (put out more spray) than the one the spray-on version of Sta-Flo is sold in. Please use a ladder, not a chair, to stand on to do the upper sections of walls, etc. - trust me, it hurts too much when you fall off an unstable chair or whatever.
It’s best to work from the top down (i.e., ceiling to floor, top of cabinet to bottom, etc.), in sections approximately 3’ - 4’wide and 3’ or so long, depending on your "reach". If you’re working with a larger piece of fabric (say a queen-size sheet), do a section the size just described, then move over and do the next top section before going further down. With practice, it’s not too hard, but I really prefer working with smaller pieces. Use push-pins to hold up the very top of your work in the beginning, especially if you’re working with the larger stuff.
Ready, set, starch!
Wet a section of the wall with starch (do not dilute-use it straight out of the bottle). Apply fabric over that area, smooth it carefully, and put the push-pins in if necessary. Now, wet down the top of the fabric with more starch. Cover the same area you just applied starch under. SMOOTH IT CAREFULLY - and make sure ALL the fabric gets wet. Any area that isn’t wet & smooth during the application will later dry as a bubble, & you’ll have to go back & fix it! The good news is, this can usually be done by simply re-wetting the bubble area (with more starch), & then smoothing it down. If it’s a really horrendous lump, you can peel off as much of that section as is necessary and do it all over.
When you need to join another piece of fabric, proceed as follows:
Apply the first piece the full length of the project. Overlap the 2nd piece approximately 1 1/2" - 2" all the way down. Apply starch as above. Now, here’s the hardest part: let it dry completely before proceeding to the next step. When it’s dry, use a straight-edge (like a ruler for rotary cutting) and razor-blade trim knife, and slice through both layers. This is easy when it’s all dry, but next to impossible when it’s wet! Now, peel off the 2 little strips you just cut, and wet down and smooth out the parts that are left on the project. The edges should butt perfectly, and disappear into the design of the fabric. (See drawing: it's 136k) Use the same type razor-blade trim knife to trim around door or window frames, baseboards, outlets, light switches, etc.
Finishing touches (optional):
Cover switch-plate and outlet covers to match the wall.
Starch 1 1/2" grosgrain ribbon over the edges, in corners, around the ceiling line, etc.
Starch some fabric pieces, let them dry (flat & smooth), then cut out motifs to "appliqué" to the walls wherever necessary. Example: when I did my girls’ room, the sheets didn’t all align exactly as wallpaper would have. I cut out additional bouquets of petunias from the scraps, and starched them over the "seams" where a bouquet was cut in half during the initial application. I had to do it with a few planets for the older grandson’s room, too. Just wet the fabric that’s on the project as if it’s the original base, and put the " appliqué" piece on top, wet it, and smooth out like before. (It was many years before I figured out that starched & dried fabric was much easier to cut designs from than unstarched - almost like cutting paper.)